Showing posts with label quilting. Show all posts

Saturday, May 2, 2020

My Mother's Cats

My Mother’s Cats
Quilt No. 130

It all started out with a photograph of my grandmother that I had printed out on cotton at least 15 years ago.  I had tried to use it numerous times and failed every time.  This time was no exception, so I’m pretty certain it’s okay to designate that creative path a certified dead end. 

I built the entire crazy quilt around Gramma in the center, but the longer I worked on it, the less interesting it got.  Definitely a contrast problem!  I finally trotted out my Box of Special Things I Don’t Know What To Do With.  This is where I keep all those cute panels and odd cushion covers and weird socks and bits of embroidery that I Don’t Know What To Do With. It helps to legitimize this warehousing process if you mentally capitalize the name of box.

Absolutely nothing in the box worked until I came across these two exquisite sleeping cats done in crewel work. They were on a white background in a piece my mother had done sometime in the 1980’s or ‘90’s.  Cutting them out and using them on a leopard print background added the warmth the other neutral toned fabrics lacked.  Everything woke up.  Except the cats.


Thanks Mom!  And since she got left out of the quilt, here’s a photo of my beautiful grandmother. 


Thursday, June 6, 2019

Julie's Tree of Life

Quilt No. 100
November 2018

I admit it. I’ve been pretty smug about numbering my completed quits, having started this way back with Quilt Number 1, some twenty years ago. I can’t even remember how I knew to do that. Possibly it was dictated by some vague ancestral memory in my DNA. So, when Quilt No. 100 began looming on my horizon it was significant

“So, I guess you’re going to do something really special for your hundredth quilt, right?”  A couple of people said this to me, echoing a thought that was already sweating it out in a tiny corner of my brain. The weight of expectation hung on me like a dead pig being carted home from market.  It was true.  It needed to be something special.  Really special.

But what?

The option of an animal quilt was out. I’d already quilted a fox, bears, a couple of loons, fish, numerous frogs, penguins, birds (also numerous), elephants, parrots, dolphins, cats, a dog, and potatoes. Yes, I know that last one is a vegetable.  More serious subjects had included my series of WWII quilts - a military graveyard, a bomb cloud, Auschwitz, and Hibakusha (honoring the radiation-affected Japanese people).  Less serious and more whimsical was my song-inspired quilt series - Let It Be, Welcome to the Jungle, Crystal Blue Persuasion, Road to Shambala, Blue Collar, Private Idaho, Horse with No Name.  Then there were the fairy tale themed quilts - The Princess and the Pea, Who’s There, The Pond at Old Tranquility Farm.  Most quilts tended to be non-series outliers such as the pre-911 New York City skyline, the Norwalk Christmas (yes, based on the virus, ugh), the human brain, cactus, and even my own personal Library Cat.  No. 100 needed to get past all of these.

I wasn’t quite sure what I could do to set it apart.  One hundred blocks? Too obvious.  One hundred colours? Too tricky.  One hundred stomach ulcers?  Getting closer.  Maybe I could drag other people into this project.  Now there was something I hadn’t done before.  An imprecise plan took shape.  Involving numerous other people always makes everything easier, right?

I thought it over, but not in any great depth. I would ask everyone I knew to give me a scrap of fabric. And… and… I would take that fabric and make a leaf for each person and put their name on it. Eventually it would make itself into a tree, a Tree of Life!  How easy would that be? It was so simple I was almost done before I had even started!

Of course, as a quilter, I had forgotten that not everyone has piles of fabric lying around just waiting for someone to request a piece of it.  People who do not commune with fabric on a daily basis would rather give you a twenty dollar bill than try to figure out how the %$#! they are supposed to come up with a chunk of fabric.

I put out the call – any fabric, no restriction as to type or colour, and a 3-inch square would be plenty.  Now if that scrap of fabric meant something special, if perhaps it carried a story with it, so much the better, but that was an optional feature. In March 2013 I sent out my plea via email, Facebook, and at my quilt guild.  I held the line at accosting people in my workplace and strangers in the street.

Envelopes started arriving in the mail from far and wide.  Fabric scraps were pressed into my hand.  Stories poured forth as friends, mostly non-quilters, gave me their heartfelt pieces of cloth. Some of those stories are captured in this blog post.

Arrival of Fabrics
I spent most of the summer of 2013 making the leaves.  I added stabilizer and backing and cultivated each fabric fragment into something that would hopefully be worthy of their individual stories. Each piece had its unique challenge as I worked my way through bath towels, organza, polyester, PJs, upholstery fabric, neoprene, paper, socks, ties, and a logo from a baseball cap. I free-motion quilted each name in gold metallic thread onto each leaf. I got pretty good at doing script writing with a sewing machine.  By the end of it, I could probably have free-motion quilted a whole blog post, but I’ll save that fun for another day. 
First Leaves
After the leaves were done the whole project pretty much fell off the wagon, into the ditch, and rolled all the way to the Sargasso Sea of Design Despair.  I had a whole lot of leaves, none of which went with each other.  Clumped together they looked creatively appalling.  I was going to need something to harmonize all these dissimilar pieces.  More leaves!  That was the answer!  So…I made many, many (did I mention that it was many?) more leaves from a single piece of non-print fabric. I chose a lovely green fabric with varying shades, from quilter/designer Elaine Quehl.  This helped harmonize the leaves, but they were still lacking the main structure – the tree! 
Harmonizing Leaves
Maddeningly, I could not come up with a design for the tree.  I looked at trees on the internet, real life trees, trees in books, and dreamed about trees, most of which were mocking me.  No tree could be found to host my crafted leaves. I put the leaves in a box where they remained in the dark for a very long time.
 
Occasionally someone would give me fabric and I would make a new leaf and add it to the box.  My creative block grew into a wall that got taller and wider. The project sat untouched as I worked my way through another fifteen quilts. I just could not come up with a tree concept.  I would pull everything out, immerse myself in utter despair, and put it all away again.  Guilt and embarrassment about my creative failure followed me around like a chihuahua Velcro-ed to my leg. 
I am fully aware that not every creative idea comes to fruition, but I had ridden the horse of failure to a whole new pasture.  If you are going to experience a creative failure, why not involve every single person you know by asking them to contribute to that project? Why not amp up your regret by making people sorry they had chopped up favorite garments, wet suits, sofas, and wedding dresses, just for you?  I had more than a few anxious nightmares about the folly of this endeavor.

One day in 2018 my friend Lily phoned me.  She is endlessly supportive and if there was a Nobel Prize for Encouragement, Lily would be the uncontested winner every year.  She was hoping I’d send her a photo of two quilts I’d made many years ago.  These were a pair of memorial quilts that brought together blocks made by families that had suffered the loss of a child.  I had some difficulty finding the photo and came across a speech I’d given when the quilts were unveiled to the families.  In the speech I’d outlined how I’d come up with the design for the quilts.  Each contributed block was completely unique in content, colour, and design.  I’d divided the blocks by colour and let that guide the final design.  The individual elements had dictated the outcome for something that had a lot of pieces that did not necessarily go together in an obvious way. This was pretty much a bingo moment. The tree itself was of little importance.  The leaves were the stars of the project.

Design Wall
Strips for Tree Planning


I taped up my highly technical and expensive design wall (the white fuzzy back on a $2 plastic table cloth).  I rough cut some strips from unwanted brown fabric and laid out a prototype for a leaning tree trunk with a bunch of branches. 


Leaves. Will it Work?
Dyed Sky 


I started adding leaves, keeping families grouped together. The leaves did indeed begin to dictate the design.  I could tell that all those good wishes and beautiful stories would indeed blend into a tree of life for which I was the sole connecting link.


Eventually, I knew I would end up with this crazy colorful treetop.  I had no idea what would be on the quilt where the treetop ended, other than a leaning tree trunk. More stalling and creative foot shuffling ensued. How could I ever balance out something so top heavy?  I tried to focus on what such a tree would have beneath it. Well, obviously…a garden!


Uh oh.  Once again, there was no picture of this garden anywhere in my brain. I bided my time, dyeing all the background sky fabrics, and assembling them, adding the finished leaves onto the tree branches. 
Dyed Sky Fabrics

No fully formed garden grew in my mind.

I tried to imagine what I would have done to create a garden if the tree wasn’t there. With no particular plan in mind, I forced myself to just start with some fabrics and see where that would take me. Several people had given me largish pieces of fabric for their leaf.  Some of these had flowers or leaves on them.  I added fusible to the back of those ones and started cutting out the individual flower or leaf shapes from the fabric.  Bit by bit I arranged these into flower beds.


A Tree of Life would most certainly have a path below it, so I arranged the garden on either side of the path.  I came across a frog in my stash.  I have made enough frog quilts that others automatically associate me with frogs.  My tiny central character was born.  After that, it was mere weeks of arranging and top stitching until the garden had sprung up to grace the pathway and the green hills that I’d dyed for the background. 


The quilt was now 65 inches tall, a colossal size compared with my other art quilts.  It weighed about as much as newly birthed elephant, and quilting it on my regular sewing machine (not a longarm) took the stamina of a Sisyphus and the muscles on a Popeye. I used rayon and metallic thread as much as possible to pump up the sparkle quotient.
   
I had the tree.  I had the garden. I was almost there! But…I had this great big empty space between them.  The green hills looked forlornly empty.  Eeesh, yet another bout of creative block walled me in, and no amount of ice cream bars or cups of coffee could pry me loose.  More time slipped by which explains how something I began in March 2013 was only finished six years later in 2019.  Finally, I came up with some long tendrils and tiny leaves sweeping down from the tree.  These happily filled in the space and added a bit of motion. They also suggested that in life, there are always new things to come.

The Tree was finally finished! It currently hangs at the foot of a staircase in my house, and when I pass by it each day, I feel the warm presence of friends and family.  And like other trees, I can never declare it to be completely “finished”. I’m always hopeful of the possibility that more leaves will be added.

Thursday, April 25, 2019

Gift from Africa


Quilt No. 127
February 2019

Ah, the vibrancy of Africa. This quilt was a fun departure from the tediousness of my usual constructions.  And it is very much a Gift from Africa, the fabric having been “gifted” three separate times.

It was first “gifted” to a friend of mine (Gift No. 1). She was given a large piece of Veritable Real Java Print in the 1960's when she worked as a nurse in West Africa. She had stored it faithfully and carefully for many years, possibly with a twinge of guilt.  If you don’t sew, how do you honor a large piece of exotic fabric?  After fifty years there was still no answer to that question. When I asked her if she would care to contribute fabric to my Tree of Life quilt, she thought of the African fabric, and gave me all two meters of it (Gift No. 2). After I made two leaves for the Tree of Life, there was still two meters of fabric remaining. It was in perfect condition, a testimony to the high quality and longevity of the cotton.

I felt that both she and the fabric deserved some kind of reward. I decided to make a lap sized quilt for her (Gift No. 3). For this this quilt, I used one of the large central motifs printed on the fabric, and added five borders on the sides, and four borders on the top/bottom. The vibrant green border fabric gives it a sort of "forest" feel, an almost organic ooziness. For the flip side of the quilt I chose a serene white, to match her décor. During the machine quilting process, I matched the thread colour on the quilt top to the colour of the fabric.  However, I kept the thread on the back of the quilt (the bobbin thread) white in case all that colour took her whole living room hostage. She could always display the calming white side of the quilt.


As I was working with it the fabric intrigued me so much that I wanted to learn more about it. It was obviously “African print fabric”, made in Africa, right?  Wrong!

I discovered that, historically, most “African print fabric” was made in Europe. In present times it’s mostly made in India or China.  So, in essence, the only thing “African” about it is the market in which it is sold.

Back in the 18th and 19th centuries Europeans were busy exploring the wonders of Indonesia.  One of those wonders was the exquisite local wax print fabrics that were made in Java.  Local artisans were very skilled in the technique of painting wax onto fabric to act as a “resist” when dyed. The fabric was painted/dyed in several sessions to achieve very detailed double-sided prints, a tradition likely borrowed from India.  Excellent quality batik-style “wax prints” were the order of the day.

When the entrepreneurial Dutch discovered this fabric, they sniffed out a potential business opportunity. They carted the fabric back home. Surely with a little automation they could crank out this fabric more easily and more profitably!  A bit of industrial tinkering ensued and they came up with a wax resin process, applying the resin mechanically with rollers.  It looked a lot like the Indonesian fabric, but instead of being a true double-sided batik, the print was only one sided.  It also had a less pristine more “crackled” appearance. Undaunted by their results, they sailed back to Indonesia, planning to undercut the fabric market.

Instantly, the Indonesians pooh-poohed this one-sided fabric. They weren’t buying it. The Dutch were stuck with the fabric. If they had been Fabricland, they would have had to rid themselves of it in a buy-one-get-two-meters-free sale.

As happens with many adventures with new products, this wasn’t the end of it.  As the Dutch sailed to and from Indonesia exchanging goods, they stopped to trade and resupply in West Africa.  There was already a bit of a demand for the Javanese fabrics there. Locals had become familiar with them in the early- to mid-1800’s.  Western African soldiers had been sent to fight in the Dutch East Indies. Upon return, they brought back Javanese fabrics for their wives. Locally, only a limited amount of fabric was being made, so new fabric was always welcome. The primed African market gushingly embraced the new fabrics the Dutch were offering. Gradually, these fabrics came to be known as “African print fabrics”.  This planted the idea that the fabrics were African made. The Dutch happily forgot about their failed Indonesian marketing scheme and began designing fabrics that would appeal to African tastes.  African print fabrics remain hugely popular today, and regardless of manufacturing origin, they are a joy to work with and to behold.

For more on the history on these fabrics, visit Mazuri Designs.

Wednesday, January 30, 2019

Look Up at the Stars

Quilt No. 129 
January 2019
"Remember to look up at the stars and not down at your feet. Try to make sense of what you see and wonder about what makes the universe exist. Be curious. And however difficult life may seem, there is always something you can do and succeed at. It matters that you don’t just give up."                Stephen Hawking     (1942-2018)
Stephen Hawking’s words bring us not only wisdom but comfort.  I thought of them many times as I worked through this quilt.  “It matters that you don’t just give up”.  I’m pretty sure Mr. Hawking wasn’t thinking about quilting when he said those words!  More than once they kept me from throwing the unfinished quilt and the torn-out remnants of my hair into the dumpster.  As I chugged along for ten months, there were many technical issues that made me want to just give up.

How to capture a life lived in a wheelchair but not defined by a wheelchair?  How to keep the delicate organza layers from shredding? How to get white text onto dark fabric?  How and what to quilt on the borders?  How to keep the differentially quilted surface flat? How to keep plugging away after the tedium of the first several hundred beads had not only drained my patience but set my teeth on edge?  All this had to be resolved.  And every bit of it was infinitely trivial in comparison to what Hawking would have faced each day of his adult life. 

Diagnosed with ALS in his early twenties, and given a prognosis of only a few years of survival, Hawking somehow conquered the odds. He not only lived into his mid-seventies, he managed to unravel the physics of black holes and teach us about the origin of the universe.  He became a best-selling author, a husband and father, an esteemed professor.  He traveled widely, including into space, collaborated with colleagues, championed the disabled.  He became a familiar character in pop culture, doing gigs on Star Trek, The Simpsons, Big Bang Theory, and despite not having anything other than an electronic voice, contributing to the recording of a Pink Floyd song (Keep Talking).  The first thing friends and colleagues say about Hawking is what a great sense of humor he had.  So, when you consider that all of this was achieved despite great physical challenges, “Don’t just give up” is more than a trite piece of advice. Hawking clearly lived by those words.

I’m inspired by life stories of survival and achievement. This quilt, designed on the day of his death March 14, 2018, strives to capture the famous scientist as the beauty of the cosmos opens up to him on his final journey.  I tried to imagine something with enough light to take the darkness of the unknown universe and make it sparkle as it welcomed Mr. Hawking.  I spent much time experimenting with gold thread, organza, beads, and crystals to chase away the darkness. At times I was knee deep in test pieces! Even adding text to the quilt became a major obstacle.  After working my way unsuccessfully through lettering by machine quilting, hand embroidery, and painting, a desperate search lead me to sheets of printable organza. By placing the words for the quilt in a Word “text box” with a dark background I was able to achieve the white font that I wanted. 

Gravestone at Westminster Abbey
If you view the details of the gold free motion quilting on the border of the quilt, you will find planets (including Earth), stars, galaxies, the Starship Enterprise, moons, and Hawking’s Equation.  Prior to his death Hawking requested that this equation be placed on his gravestone.  This is located at Westminster Abbey, between Isaac Newton and Charles Darwin, placing him with very esteemed company. 

The whole time I was working on this quilt I was considering various options for its title. In fact, it was finished before I settled on a title. One very early morning I was tossing ideas around in my head while making coffee.  “Look Up at the Stars” I said to myself, involuntarily glancing out the kitchen window.  It was still dark.  Most of the sky was blocked by the house next door, so I could only see a small part of it.  In that tiny bit of jet-black winter sky there was a single very bright star, or perhaps a planet. In over thirty years of making coffee and looking out that window, there had never been a star in that spot. I stopped auditioning titles.  The cosmos had made its selection known. 

Hawking discovered that radiation can escape from a black hole, contrary to what was previously believed.  So, it would seem that black holes aren't entirely black at all. Instead, they emit a glow now called Hawking radiation to honor his mathematical equation.  This extends our understanding of how the universe grows and changes over time.  Well, for some of us it extends our understanding. I would not include myself in that group.

Stephen Hawking recognized no limitations personally or professionally.  He had many lessons to teach us that were beyond mere astrophysics.  After his death, Hawking's children released a statement with this quote from their father. “It would not be much of a universe if it wasn’t home to the people you love.”

What mattered was not how different Stephen Hawking was, but how much like us he was.  For that alone, I thought he deserved to be honored with a quilt.


Hawking’s Equation

T = Temperature (radiation temperature)
H = Planck’s constant (quantum mechanics)
C= speed of light (from Einstein’s formula)
8 π = meaning it is spherical
G = Newton’s gravity constant
M= mass of a black hole
K= Boltzmann’s constant (energy of gas particles)


Monday, April 16, 2018

Solo Fish

Quilt No. 123
February 2018

The year’s guild challenge was to do a “curves” quilt.  This definitely threw my fondness for straight edges into disarray.  Thinking outside the box is always troublesome, especially when your box is strictly straight edged and symmetrical.  If you were to chip open my skull and peer in at my brain, the convolutions would likely be arranged in perfectly straight rows of long boxes with  crisp right-angled edges.  What you wouldn’t see is any of those snakey sausage-like structures.  So “curves” as a point of inspiration didn’t leave me awash with great ideas.

Several months went by and the idea bank had a balance of zero.  Less than two months until deadline…

While working on Space Fish, I made some large folds in the background fabric.  This resulted in a lot of excess fabric on the back.  I cut the excess from the three folds and set these rectangular pieces aside.  Stacked together, I had to admit they had some appeal. 

I found a piece of dark blue polyester satin to use as a background for the rectangles.  The top of this piece had been hacked off in an asymmetrical curve, a leftover from some other long forgotten project.  Without even trying, I’d found a curve! 

The next thing I needed was a focal point.  I paraded many objects over the fabric until I came to the antique fish pin my husband had bought for me at Relics.  Finally, things were going swimmingly.  Adding in a few satiny waves suggested by the fish, I had it – the layout for my curves challenge quilt!

Saturday, January 27, 2018

Space Fish

Quilt No 122
January 2018

There are no fish in outer space.  I think that’s a darn shame, so I’ve made it my mission to correct the fishlessness of space.  Somebody had to do it.

The background of this quilt is a piece of fabric I painted with Setacolor light sensitive dyes.  I overlaid it with cheese cloth and foil confetti stars.  I’m pretty happy that I did this outside, because the lawn mower was still blowing around tiny foil stars a whole year later.  Had I done this indoors I would probably still be spotting stars in my oatmeal or consorting with the crumbs under the stove. 

The fish are my first attempt at what I call “extreme trapunto”.  (Trapunto = stuffing).  I put fusible on the back of the fish but only fused the outer edges, squeezing the shapes while fusing them, so that they bulged outward.  This allowed for plenty of stuffing, yielding fish that are on the high end of the extreme plumpness scale.

Space Fish was quilted with various gold metallic threads plus Superior Glimmer thread to give it a little more sparkle.  You need that sort of thing when you’re in deep space.  Life in a nebula can be lonely, even for a fish.  


Monday, October 23, 2017

The Pond at Old Tranquility Farm; Kexy and the Fairy


Quilt No. 120
October 2017

Over the last year or so I kept seeing fairy creatures everywhere.  This hadn’t happened to me since I was five, and my dad and I worked our way through “Fifty Famous Fairy Tales,” one story at a time.   I still have the book’s alarming illustration of a green-ink line drawing of Rumpelstiltskin seared into my brain.  The artist certainly captured the rumpel, not to mention the stilt and the skin!  Fairies are once again popular.  They’re in gardens where they have houses, furniture, flower pots, or just humble doors backed up against tree trunks.  They grace t-shirts and cupcakes, make their appearance in calendars and continue in their unbroken stint as popular Halloween costumes.

So I thought -- wouldn’t it be fun to do a quilt with a fairy on it?

I looked at lots of pictures of fairies in Google images.  They certainly were plentiful and elegant.  Once again the lush illustration style popular in the early 20th century story books caught my eye.  So many enticing fairy creatures to choose from!

I’m also rather fond of quilting frogs, so when I found Ida Rentoul Outhwaite’s 1922 painting with both a frog and a fairy, I knew it was the one.  The fairy was particularly beautiful, so gentle with her captivating pink dress and gauzy wings.  And the frog!  He was the quintessential frog that we all dream of – plump and green with an essence of royal frogginess that hinted at a princely lineage.

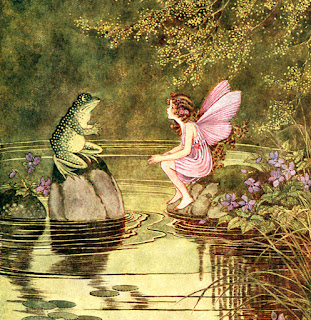
Ida Rentoul Outhwaite's Original Artwork
I was in fact, so enamored with Outhwaite’s artwork, that I completely took leave of my senses, forgetting the rules I have about things that I don’t quilt:  hands, faces,  feet. There’s a special subcategory of frog hands and feet that I particularly like to avoid, having previously driven myself to the brink of insanity while trying to needle turn the fabric to make slender frog fingers.  It was just like childbirth.  I completely forgot how wretched it was the first time around, leaving myself open to repeating the suffering.  And in terms of suffering, the frog and the fairy did not disappoint.

Their genesis in fabric was long and dizzying in its repetitiveness.  I became a card carrying resident in the land of Do-Over. At one point I was calling the quilt The Six Faced Fairy, a much needed bit of levity that took me through the six tries it took to do the fairy’s face.  Her arms took four tries, and her hair, dress, and legs a mere two attempts.  Only her wings were nailed on the first pass. What I learned (re-learned) from this was that my rule about no faces, hands, or feet, is completely valid.  However, I didn’t think Ms. Outhwaite would have approved of me adding galoshes and mitts to her fairy. 

I like to name a quilt early on in its creation, but this one remained nameless until after it was completely finished.  Nothing came to mind other than the utilitarian “Frog and Fairy” possibility.  Ugh.  I didn’t even know their names or their story.  Observing them, it’s clear that they are embroiled in a situation.  A question is being asked, or a plea is being put forward, or maybe a controversial point is being painfully explained.  Yet, despite having birthed them from the fabric fragments in a drawer, I could only guess at the topic of their debate. 

I needed to find out more about these two characters who had eaten up six months of my creative life.  The illustration is from the story book, The Little Green Road to Fairyland.  It’s an Australian book written by Annie Rentoul, and illustrated by her sister Ida Rentoul Outhwaite.  Ida’s illustrations were so captivating that the stories were crafted around them, not the reverse which is the usual case.  While very popular in Australia and England, I don’t think any version of the book was released in North America.

According to the combined international listings in the online WorldCat catalog, only one library in Canada has a copy, (none in the U.S), and that library is over 800 km from where I live.  Considered a rare book, it seemed unlikely they’d be willing to mail it out on interlibrary loan.  Purchasing a used copy of this almost 100 year old book was also out of the question at a cost exceeding $US 200. Sadly, no copies are scanned into Project Gutenberg.  I was going to have to get creative if I wanted to dig up the name of that frog! 

Wouldn’t libraries in Australia have a copy of the book?  I looked in the online catalogs of their national and state libraries, and they did indeed have the book in their various collections.  On the website of the State Library of South Australia, located in Adelaide, I noticed that there was a form I could fill in to ask a reference question.  Bonus - international requests were accepted!  And what could be a more important international question than the names of this frog and fairy?  I filled it in and sent them a photo of the quilt so they would know which illustration was of importance to me.  After two weeks and plenty of breath-holding on my part, my answer arrived.  The frog is named Kexy.  Disappointingly, the fairy has no name, and is simply referred to as “Fairy” but the location in the book places them at Old Tranquility Farm.  I had my answer and my quilt title: The Pond at Old Tranquility Farm; Kexy and the Fairy. 


I still don’t know what their debate is about, but since they refused to reveal it in the six months we spent locked in mortal quilting combat, perhaps it’s too personal and I shouldn’t pry.


Monday, June 26, 2017

Polar Bear Dip


Quilt No. 119
June 2017

I live far enough north that bears are a constant source of conversation. I’ve encountered them quite frequently. On the edge of the city where I live they’ve come within a few feet of the front door.  They’ve roamed around our yard with police in tow.  They’ve climbed trees in the yard, refusing to leave until  someone got serious with a tranquilizer gun.  (No bears were hurt – but one wheelbarrow was demolished by a falling bear).  At our cottage bears have graced all parts of the property with their blueberry spiked droppings, left half-eaten fish on the path, and found and mauled our food cooler that had been sitting on the deck for less than five minutes.  So for these and many more reasons, we think about bears quite a bit.  Of course, we are not that far north, so all of these bears are black bears.  This is a desirable state of affairs, since black bears are generally quite easily frightened off.  Polar bears?  Not likely to be shooed away by your thrown sneaker.

It seems kind of unfair then that I would do a quilt with polar bears rather than black bears, but whoever said that life was fair?  (Your mother doesn’t count).  

The polar bear design that I turned into a small wall quilt originated at NeedleworksStudio in Cochrane Ontario.  It was designed by Christina Doucette for Row by Row Experience.  For the uninitiated, Row by Row Experience goes on in quilt shops in Canada, the U.S. and Europe.  Each shop designs a block that incorporates the theme for that year.  Each one usually has a local flavor.  The blocks are long and narrow, meant to be sewn together with other “row” blocks.  Add borders, and voila, a full sized quilt emerges.  Of course you don’t have to combine rows, you can stay with just one and use it as a wall hanging or table runner. 

Polar bears are perfect for a block that originates in Cochrane.  It isn’t far enough north to have polar bears dropping by, but it does have a state of the art Polar Bear Habitat.  You can even watch them live if you aren’t lucky enough to be within driving distance.

My husband liked this block when he saw the kit displayed in the shop.  I pretended not to notice that he was hinting that I buy it.  I already had too many unfinished projects on the go – no time left for bear essentials. 

It kind of nagged at me that I hadn’t been more generous and offered to make if for him.  A year later a friend was down-sizing her stash and gave me the pattern and some fabrics she’d already picked out for it.  Destiny was looming.  The bears were coming for me.

I went ahead with some of her fabrics and some of my own.  I found a short fiber plush-like fabric in my drawers of “whites” that was pretty much the most ideal polar bear fabric in the history of mankind.  Clearly this was karma in its purest form.  I even managed to get the nap of the “fur” going in the right direction.  Once you’ve touched one of the polar bears on the quilt it’s as addicting as stroking a cat.  You will be back for more.

The northern lights proved problematic.  I didn’t want to risk pulling in a small section of the background with the close stitching of “thread painting”. Without proper planning you will pay for this with ripples somewhere else in the quilt.  I tried some fancy stuff with organza, but just like everything else I’ve ever tried to do with organza it was a flop. Actually, I came up with something that looked like a smoky shrub, a foolish object for an Arctic sky. I finally hit on the idea of using up some of my precious wool roving (where DO you buy that stuff without having to buy something the size of a football and the price of a car?).  It worked out pretty well until I ran out of it.  I consulted my Weird Wool Drawer and found one ball that had wool varying in size from skinny strings to fat wool.  I stripped out the skinny strings, chopped out the fat wool parts, and I had some DIY roving.  Best of all, I’d finally used something out of that drawer.  It’s a sizable collection of wool oddities that are almost never useful. I think it’s in cahoots with the organza. 

The Weird Wool Drawer


Tuesday, May 9, 2017

Dave the Dachshund

April 2017

It can’t always be about quilting.  I know.  It’s a travesty.  It ends up being necessary to put everything in life into one of two categories: 
  • Category 1:  Quilting
  • Category 2:  Not Quilting

Category 1 takes in all quilt related activities including thinking about quilts, talking about quilts, reading about quilts, and actually occasionally making quilts.

Category 2 takes in, well, everything else, including eating, sleeping, and painting the kitchen.  Ugh.

Category 1 is quite elastic and can be stretched to include sewing if the item in question can be somehow related to quilting.  For example, sewing pyjama pants is a quilting activity, since sometimes I wear them while I’m quilting.  Sewing to repair clothing falls into Category 2, as it is an essentially nasty pursuit that misuses time that could be more appropriately devoted to Category 1.

Watching the TV series The Great British Sewing Bee is a Category 1 activity.  This show is a low calorie version of The Great British Bake Off.  I had to abandon watching that one after I dragged the TV into the kitchen so that I could commune with the chocolate chips during the show. 

They don’t do any quilting on The Great British Sewing Bee, but it does cover a lot of the same skills that quilters use. I’ve completely fallen under its spell.  It’s the stitchery equivalent of Survivor – 10 sewing enthusiasts duke-ing it out for top dog status.  One person must leave “the sewing room” each episode.  At this point, the moderator who makes the announcement chokes back tears.  The sewing contestants all cry, and I sob inconsolably into the arm of my leather chair. 

As the GBSB camera wandered from table to table, it became evident to me that all the cool kids had huge and amazing pincushions they had made for themselves.  The one that made me whimper with envy was the dachshund.  Who doesn’t love this adorable unpronounceable and un-spellable breed of hound?  The beloved “wiener dog”!  I wanted my very own wiener dog pincushion.

I currently keep all my pins in a dish on my psychotically cluttered quilting table.  I rarely have a session at the table where I don’t knock this dish onto the floor, strewing the contents all the way to the house next door.  It’s become a ritual that I’ve learned to endure.  Picking up all those pins every day is keeping me flexible. My fine motor skills are top notch.  I could get one of those magnetic pin dishes, but then the pins get magnetized and my scissors become an unusable porcupine-like object.  Un-clamping magnetized pins is worse than a crawl around the carpet and has no therapeutic value whatsoever.  But... a pincushion that doubles as a cute animal companion?  That struck me as the ideal solution. 

I easily found the free pattern for Dave Dachshund at Sew magazine.  It wasn’t too complicated.  I even managed to avoid being dissuaded by the word “gusset”.  (It’s on my list of Hated Words).  Within a single day, Dave was lolling on my quilting table and radiating advanced cuteness.  I couldn’t actually stick any pins in him though.  My Facebook friends (pet lovers all) were quite vocal about implementing a “no-stab” rule for Dave.  I didn’t have the heart to point out that Dave is made of cotton and lacks a nervous system.  So the pins have stayed in the dish, and Dave has been put in charge of it.  And to his credit, he’s only spilled it twice.

Sunday, October 16, 2016

Wysocki's Victorian Street


Wysocki’s Victorian Street
Quilt No. 115
September 2016

I’m still feeling the inspiration of the crewel, crewel world of embroidery-quilt fusion.  Metaphorically, it’s like jumping out of a plane.  Once you cut the embroidery out of its background fabric, you are on an unwavering trajectory.  Hopefully the conclusion will be a pleasing one, but failure to open your parachute or execute a satisfactory quilt will have the same critical ending.  There will be a splat.

It seems lofty to say it, but this quilt started out as a Charles M. Wysocki painting.  His works are fascinating to examine, simple in appeal, rich in detail, rendered in warm tones.  Many of his compositions are fictional towns or villages reminiscent of American life from the 1800’s to the 1930’s.  They beckon you to pack up your steamer trunk and move in.  We can’t all own a Wysocki painting, but we can experience his art through the Wysocki calendars and jigsaw puzzles that have made him so well known. Converting his art into crewel embroidery kits gave us another way to enjoy his designs.

I was surprised to learn how similar his method for creating a painting is to designing an art quilt.  Wysocki did not paint existing places, but used his imagination to take ideas from several sources and bring them together into a new and convincing scene. The  Swoyer's website gives us a peak at the steps involved

Wysocki's method of working is painstaking and methodical. When he gets a concept for a painting, he first draws the various elements on small pieces of tissue paper. There might be two or three or as many as dozens of such mini-pieces. These are moved around, or changed, or developed, or all three, until he is satisfied that he has a balanced composition. He might then do an overall drawing on tissue and then embark on color. If the color is not going properly, he will start all over again to redesign. Sometimes a painting will take weeks to develop. Sometimes all the many elements fit easily and everything seems to fall into place.

I too have used this method, and taking elements from numerous sources, moving them around endlessly until they cooperate and form a into something that matches the murk of my mind’s eye. This was the technique I used for Horse With No Name.  I’ve certainly never been as accomplished as Mr. Wysocki, but having used the same technique does give me some appreciation for the patience it takes to continue rendering a work of art through the frustration of the initial unsuccessful stages.

It was a humbling experience to take Wysocki’s brilliant artwork through yet another rendition in its path from painting, to crewel embroidery, to quilt.  The original framed embroidery had a plain background that left the street floating unanchored in the picture frame. I wanted to take it back a step in time and ground it with earth and sky.

My mother had completed this embroidered piece in the 1990’s.  It hung on the wall of her Ohio home for many years, proudly flying a tiny American flag in her American/Canadian household.  Many years later, the piece looked out from the wall of her Canadian home, the flag still flying and unconcerned with its new location.  Regardless of the location, visitors always paused to admire her handiwork and choose a favourite house on street. 

When I decided to give this embroidery the “quilt treatment”, it took me more than a few weeks to get up the courage just to un-frame it.  Washing it by hand was the next scary step, but both the embroidery and I survived the act.  The background shrank in unison with the crewel wool, but the embroidery floss did not shrink at all. 

My next step was to stabilize the piece with fusible cotton.  I trimmed the background off, carefully snipping around the trees.  I sewed the earth fabric to the sky fabric, and fused the embroidery onto that.  This stabilized everything nicely, and allowed me to machine quilt it with “invisible” thread to give a more three dimensional look to the buildings, people, horses, and so on.  A considerable amount of “touch up” needlework was needed because of the variable way it had shrunk during washing.  I saved this step until the quilt was completely finished so that any additional problems caused during quilting could be fixed at the same time. I finished the quilt with a wide black binding. Surprisingly, the piece went back to looking like…a framed picture.

During the process of quilting this piece it was easy to become lost in the detail, leading to an appreciation of the care and skill both Wysocki and my mother had poured into its creation.  I felt he had scrupulously achieved one of his key goals for his work. "I want drama and light, carefree times or a lonely, heartfelt memory." All of these come to life when you're strolling down Victorian Street.

Tuesday, September 20, 2016

Who's There?

Quilt No. 114
September 2016

Comfort. It’s a bad thing.  Despite the fact that it’s the thing we most desire when we’re toiling away at work, or when we’re swishing our butts around on those metal chairs they set up at graduations, comfort is no longer a good thing.  And the most offensive part of comfort?  Your own personal comfort zone!  It is now imperative for you to remain outside of it, where you will produce new and wondrous works of art.  It doesn’t matter if you gnaw off your arm in frustration along the way to making that art.  It doesn’t matter if you have less fun than the last time you had a root canal and a bunion removal on the same day.  Just like a marathon session of childbirth, the suffering will be erased from your mind when you see the finished product.  At least that’s the theory.

I hear it over and over.  “Get outside your comfort zone.”  This pretty much goes against the grain.  Humanity has spent more than a few millennia courting comfort.  Nearly all of technology has been developed in the name of comfort or its cousin, convenience - which is really just another way to garner comfort.  Ordinary things like eye glasses, air conditioning, bear spray, and Prozac have been invented to give us comfort.  We are genetically programmed to wallow in the blissful comfort of sofas, slippers, and Spandex. But in the same way that adversity fosters the creation of art, tossing aside your comfortable ways and plowing into the danger zone will win you the rewards of creative glory.

My take on this? It’s pure phooey.  All this “reaching” and ‘”stretching” and “pushing” is best saved for episodes of yoga or hockey or putting on those extra small pantyhose you bought by accident.

It is perfectly appropriate to step back inside your comfort zone.  Breathe in the euphoria.  It’s the zone where you are meant to be!  That’s exactly what I did with this quilt.  I deafened myself to the nay-saying anti-comfortists and did a quilt in the appliqué style with which I am infinitely familiar.  It felt utterly liberating.  I didn’t spend hours trying to figure out how to do something novel.  I was free of the grind of problem solving and trouble shooting and cussing over the fact that I was cussing too much. 

This quilt, made from a drawing I saved a few years ago, was a dose of fun.  I was captivated by the owl’s expression and the intimate winter setting.  A story is hanging in the air waiting to be told.  It’s early evening.  The snow has just begun its tentative descent.  The tree trunks huddle together in the sparkling snow, gathering in the silence that marks deep winter.  The owl opens his pink door to see a surprise.  Who’s there?

So, I’ve taken back my comfort zone and in the process I’ve learned something.  Not every endeavor has to supersede the last one.  I can’t believe I didn’t know that.  Sometimes “success” is just satisfaction.

Annoyingly, I’ve lost the source where I found this picture, so I can’t give proper credit to the artist.   While allowing my comfort-addicted brain too much leeway, I simply cannot remember where I found the original drawing.  Book?  Internet? Fever dream?  I wish I knew.  I’m still looking.

October 24, 2016 Addendum!  Thanks to the TinEye Reverse Image Search engine I've located the source of the original drawing for this quilt!  I uploaded the image of the drawing I used to create this quilt and easily found that well known children’s book author and illustrator Arnold Lobel (1933-1987) was the artist.  The drawing, Owl At Home, is the title page for a book of the same name that Mr. Lobel wrote.  He is also the author/illustrator of many other children’s books, including one of my favourite series, Frog and Toad.  Mr Lobel’s Owl At Home drawing came up for auction in 2009.  It was expected to fetch $US 10,000 – 15,000, and was sold along with famous works by Ted Geisel (Dr. Suess) and Maurice Sendak (Where the Wild Things Are).

Friday, January 15, 2016

Deep in the Scrappy Forest


Quilt No 109
January 2016

A frog pops his head up from behind a rock.  He surveys all that he sees.  It’s definitely frog-worthy.  He's met the challenge - he’s deep in a scrappy forest.

I’m beginning to suspect that maybe, just maybe, having limits placed on you might make you a better quilter.  Oddly, this same philosophy applies to child rearing as well.  Too many loosey­-goosey parameters and the quilt or child becomes a wild and unruly beast, an annoyance to everyone in its sphere of influence.  But...add a few limitations and you get just enough latitude to nudge it along to become all that it can be.

This year’s annual guild challenge was to make a “scrappy quilt”.  This means to take all the leftovers from other quilts and make a new quilt out of those. To accommodate quilters at all levels challenges are kept straight forward.  They never involve wild ideas, impossible to achieve technicalities, or the spending of giant sums of money.  Decisions about size or colour or complexity are left up to each quilter.  The fewer the restrictions, the greater the yield of quilts.  The challenge is not so much about following the rules as it is about making the theme your own.

When the scrappy quilt challenge was announced everyone turned to look at their seat mate and nodded their heads approvingly.  Yep.  Everyone had at least a refrigerator-sized pile of fabric scraps they could plunge into.  Ultimately, some people dove into their pile so many times that they made three or four quilts.  In a few cases, previously undiscovered nieces and nephews got new quilts from an aunt they’d never heard of.  

I couldn’t wait to make the challenge my own.

Two weekends after the announcement of the challenge I was at the cottage.  This is a place that is on a lake in the bush (we don’t use the word “forest” in Northern Ontario).  I go there with my sewing machine and a large box of fabric every weekend.  I also cart along a lot of other things of lesser importance, like food and water.  I’ve forgotten various components of these over the years but I’ve never forgotten my sewing machine.  I’ve never even forgotten my sewing machine cord – a common rookie error among quilting workshop attendees.  One memorable weekend I forgot the quilt I was working on.  I just started on another one with what I found in the box, and came up with the tiny quilt, Looking for Atlantis.  I decided to do a repeat performance for the scrappy quilt. 

My plan evolved.  I would make my scrap fabric quilt exclusively out of the fabrics I found in the box.  Generally, I have a couple of quilts on the go.  For every fabric I use in a quilt, a dozen different fabrics may be “auditioned” before I select the final piece, so there’s always a wide variety of fabric battling for space in the box.  Fortunately, I only need small pieces for my quilts, so I can make do with a single largish box.

I had tried to tame the bits and pieces in the box using two bags for scraps.  One had ordinary scraps and the other had scraps that had some sort of fusible material already ironed onto the back.  Fusibles allow you to iron pieces of fabric directly onto the quilt top.  All of the scraps were relatively small and irregular in shape, mere shards left from one quilt or another.  Only the tail ends of quilt binding strips had any straight edges.  I narrowed my challenge even further and vowed to make my scrappy quilt top using only the scraps in those two bags.  There!  I’d made the challenge my own

Here are a few items from the scrap bags.
 As much as possible I let the scraps dictate the composition.  Leftover appliqué trees that didn’t make it into a previous quilt were used. The longer horizontal strips near the top of the quilt suggested the curvy lines of forested hills, so I used those just the way I found them.  When I began working on the border I found I was short of fabric. I ultimately had to stray outside of the two bags from the cottage box and add in some pieces from another box of scraps at home.  It wasn’t really cheating, since they were still scraps.  And when you set the limits yourself, you’re allowed to alter them.  I came up with that rule myself.  It’s the spirit of the limits that count.

When all the scraps had coalesced their cosmic dust into the universe of a new quilt, the stars from Lost on the Ocean had found a new home.  The trees from Reach for the Stars were rediscovered, and the flowers from Horse with No Name had moved out of the desert/ocean and taken root near a swamp. The frog near the rocks had recovered from being passed over for a previous post card quilt. 

Surprisingly, the multiple layers of fused fabric I used in this quilt kept it nice and flat, suggesting that I had previously been under utilizing stabilizers.  Who knew?  By doing most of the decorative and raw edge appliqué stitching only on the quilt top everything stayed smooth.  No dreaded ripples took hold after I added the batting and backing and did the machine quilting.  And, best of all, the abandoned quilt scraps settled down happily into their new life deep in their own forest.  They would never be mere scraps again.