Tuesday, February 12, 2013

A Horse With No Name; The Ocean is A Desert With It's Life Underground


Quilt No. 89
February 2013

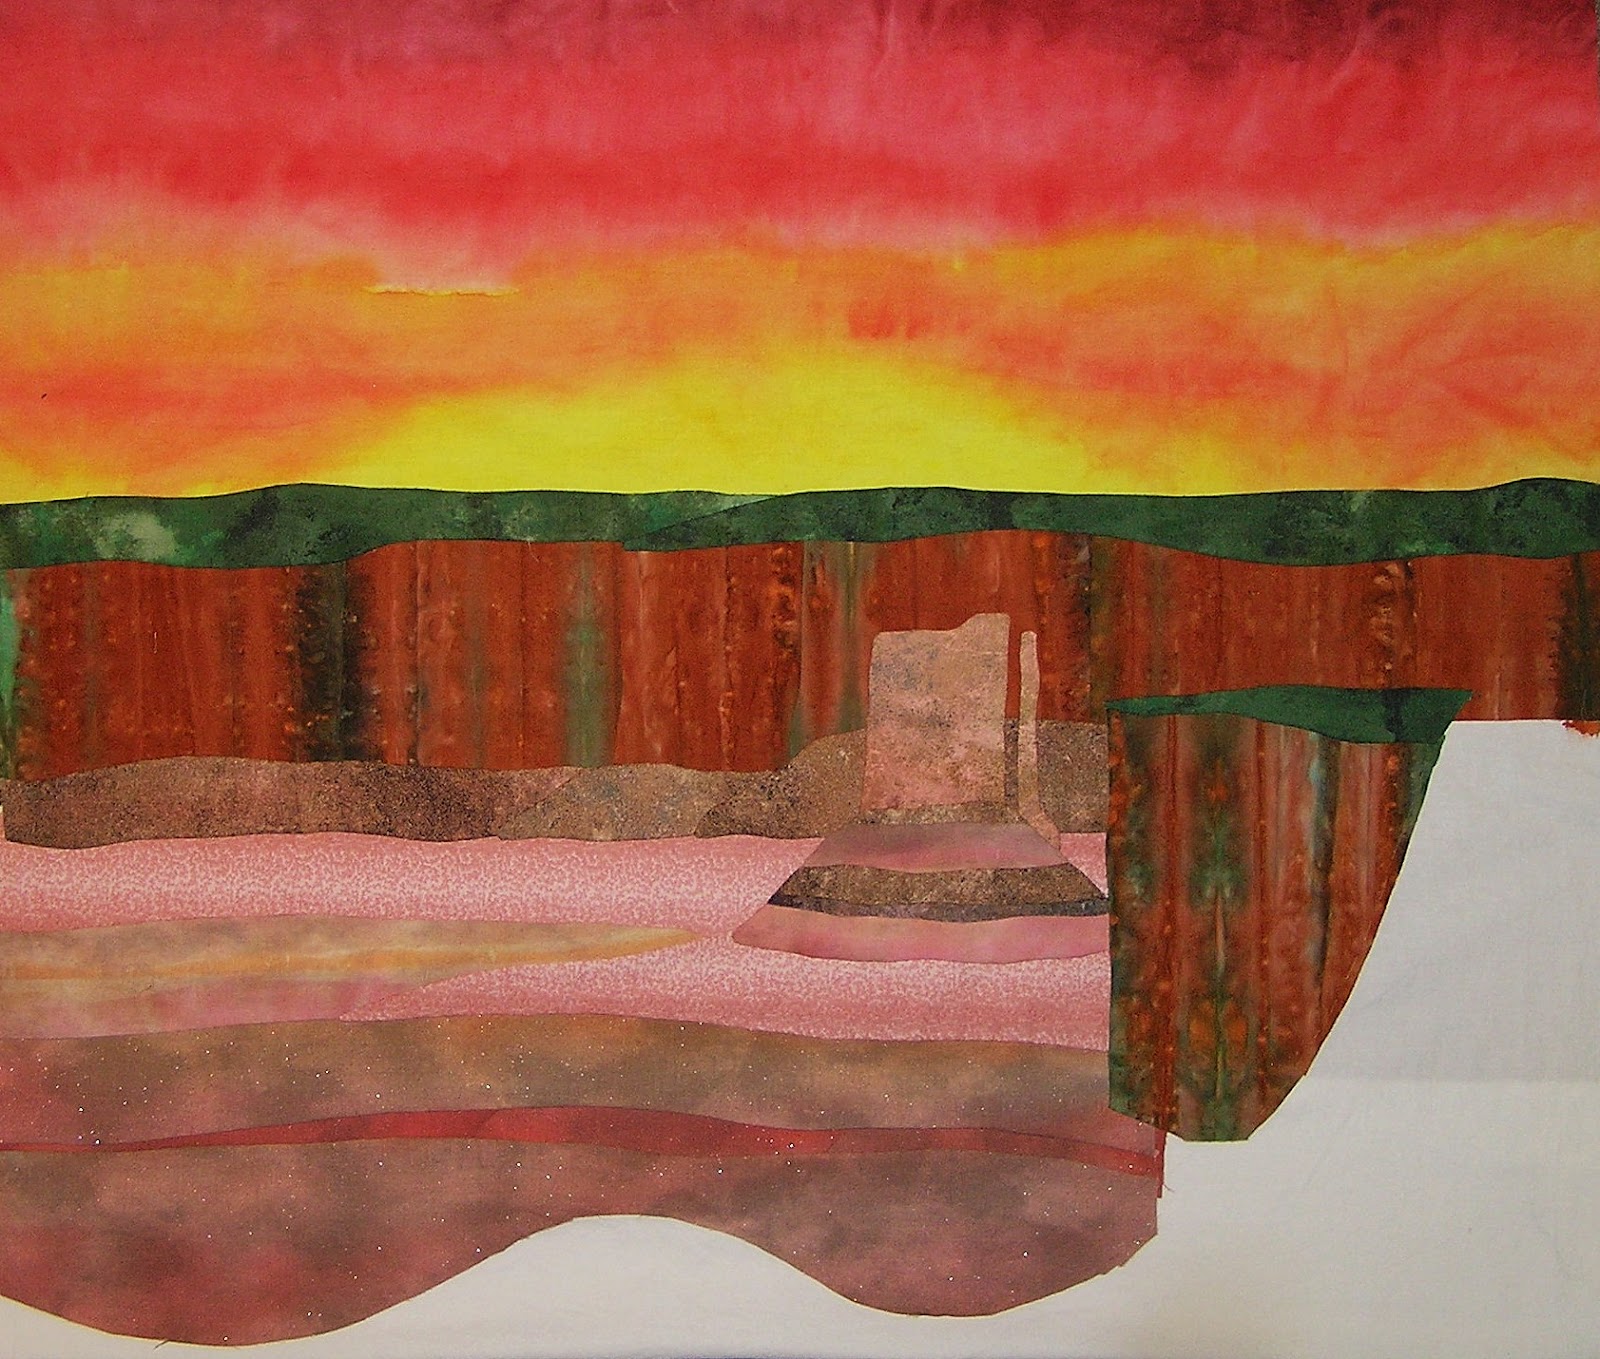
I may not have exactly been to the desert on a horse with no name, but I must say it feels good to be out of the rain.  And it’s been a long journey from the desert to the ocean with its life underground – a journey of almost a year, in fact.  A few other quilts have passed Horse in the queue, going from conception to completion while Horse waited in the background – waited for cacti, waited for a mesa, waited for the dye to dry on yet another piece to be used in the desert floor.  Waited on a technique that would yield anemones, waited on a seahorse, waited on a starfish, waited... and wondered...  would there ever actually be a horse?

I learned a few things from this quilt.  One was patience.  If a design element isn’t working out, the best route after executing multiple failures is no route at all.  Eventually a solution will present itself, in its own time.  I learned that you can actually wear out something you’ve added to a quilt by endlessly folding it and scrunching it during the quilting process (the Agave plant at the foot of the cacti had to be completely replaced after the first one frayed into oblivion).  I learned that keeping all those little scraps of dyed material was actually worth the effort.  I learned that organza, like velvet, should be added to my list of banned substances.  Organza is like just about everything else in life that adds a lot of flash.  It’s kind of hard to be sure if enduring the exasperation is worth it.  In this case, I would have to say yes. 

And I learned one other thing.  Eventually there will be a horse.  But you have to look for him.  And because the horse owns the quilt, he can afford to orchestrate things from behind the scene.

Thanks to Dewey Bunnell (of the band America) who wrote these haunting and intensely visual lyrics back in 1972.  From what I’ve read, a rainy stint in England had him thinking about the Arizona/New Mexico desert near the Vandenberg Air Force Base where he lived as a child.  If “horse” was a code word for heroin, it was probably the brain child of someone else’s imagination. 

Quilting Notes

The sunset was painted with (what else!) Setacolor dyes. The whole quilt was built up on a white cotton background using needle turn applique for larger objects and fused raw edge applique for smaller items such as the seaweed near the fish, the anemones, the sea shells and some of the plants.  Heavy gold thread or wool was couched along horizontal cliff and desert floor lines to harmonize them with the sunset - or sunrise - depending on your preference.

Organza was used in a layer over the ocean floor, and for the starfish, as well as the white wave that separates the desert and the ocean. It was also fused in layers to make the tentacles for the sea anemones.  One grouping of seashells was placed beneath the layer of organza to make them fade into the ocean floor.   Pink flowers and a few Agave leaves were also placed under the organza to give a reflection of their desert counterparts.  

A very small amount of beadwork was added to the quilt – on the starfish, as bubbles for the fish, and on the hand embroidered seahorse.  Small pink and white polished “gem stones” were added to the seashell cluster on the left. 

Most of the quilting and outlining of fused objects was done by machine with gold, red, or copper metallic thread.  Microtex sewing machine needles made the quilting possible.  While metallic thread needles almost worked, the thread inevitably frayed and broke, since the quilt is many layers thick in places.  After I switched to a Microtex needle, the machine perfectly executed anything I asked of it.  In order to machine quilt close to the heavily stuffed saguaro cacti, I removed the free motion foot and used the needle with no foot.  It was scary, but some people climb mountains or jump out of airplanes or wrestle bears -  I machine quilt without a foot.  Now we’re even.


The horse makes his appearance in the photo below.


Here are Dewey’s lyrics in his own handwriting.

Sunday, January 13, 2013

Goin' Global


Quilt No. 88
January 2013

I always feel that a sort of collaboration has taken place when I take a quilt class or learn a new technique from another quilter. Any kind of inspiration that starts me off on a new quilt gives me that wondrous feeling.  Usually, the source of my inspiration is pretty elusive – I don’t get many calls from Fred Turner or Randy Bachman (Blue Collar) or Tommy James (Crystal Blue Persuasion). 

The “collaboration” that resulted in Goin’ Global was entirely different.  The Timmins Quilters’ Guild was lucky enough to host Kathy Wylie for one of her dynamic and interesting talks last fall.  Goin’ Gobal began in a workshop she taught at Lori’s Sewing Place

But first, let’s move back in time a little. I credit my unabated lust for quilting to my Grandmother.  When I was four or five years old she would sit me down with a jar of buttons, a piece of cotton, and a needle and thread. I would be spellbound for hours.  At times both the buttons and the cloth would be sewn to my pants or the sofa, but she pretended not to notice.  Shortly after I mastered button sewing, I graduated to embroidering my name on every tea towel that wasn't nailed down. I've loved needlework in any form since then.

It was the same with paper snowflakes.  I don’t remember the teacher who first taught me how to take those painfully blunt school scissors and cut out paper snowflakes. It’s something I still do now and then for the sheer joy of cutting paper and seeing what will be revealed. 

Kathy Wylie’s creative adaptation of the paper snowflake technique has resulted in her striking and award winning quilts.   For me, her “sewflake” technique has an irresistible pull.  It’s a wonderful example of what makes quilting not just good, but great – the willingness of quilters to share their knowledge.  When so many activities have been reduced to mere acts of competitiveness, quilting culture still fosters camaraderie with the sharing of “secrets” and discoveries.

And it’s no big secret that I have a fondness for penguins.  Who doesn't adore those stoic, waddling, black and white birds that have cast aside flight in favour of swimming?  So when Kathy encouraged us to choose favourite objects or shapes to launch our in-class creations, I chose penguins.  After a bit of happy trial and error, I ended up with twelve penguins holding wingtips and dancing in a circle .

My next task was to figure out what twelve penguins might encircle.  In the wild it would most likely be twelve other penguins, but one could easily end up with way too many penguins trapped on a quilt.  Maybe…a globe of the Earth?  A lovely idea, but one I’d used too many times already.  A snow globe?  It provided whimsy and magic with a quiet snowfall sifting down on a tiny village.  I printed out the village portion of a snow globe image I purchased on the internet, but used my own dyed background and foregrounds for the globe.  To create the illusion that it was snowing, I painted a piece of cotton with my beloved Setacolor dyes and sprinkled ground up oatmeal flakes on it while it was still wet.  Success in only two tries!
  
The penguins were hand appliquéd onto the background over the snow globe.  The white portions of their bodies were fused to the dark part and outlined with hand embroidery. It was definitely more fun than adding my name to a tea towel.  When the piece was finished I trapunto’d (stuffed) the snow globe to give it the nice rounded shape.  

I added some radiating dark “flame” shapes.  It was kind of dull looking until I found the intense blue swirly star fabric in my stash. The penguins seemed to approve of that.  The quilt began to look like Southern Lights or perhaps a giant splash-down.  I like to have a quilt that remains open to interpretation.  It allows others to come up with their own idea of what the quilt might have to say.  I was thrilled by interpretive comments from friends.  One, a poet, wrote to me that this quilt was “almost like a fresh dahlia growing and sending life into the universe. The circle village seems enveloped by comforting leaves of hope and life. Radiant stars encourage sparkling appreciation of living in today's world”.  For her, the penguins were “holding hands as they encircle the world with love and helping hands. ... If humankind did this - what an amazing healing world we could share.” I was humbled by her interpretation of the blue rays “of light suggesting that we need to keep our hearts and minds open to one another - to try to be non-judgmental - to share and improve what we can in a world of incredible beauty and yet so much suffering.”

Another friend viewed the quilt as an expression of environmental concern.  “I see this as a reminder from our vulnerable friends, that even though they are supposed to be living in a cool blue world, things are heating up everywhere, and although the "flames" have just recently manifested in their environment, and are still weak (blue), they will be progressing in our lifetime to hot yellows and reds. Then where will our little friends be?”

Yet again I am elated at the power of fabric to speak to us in so many unexpected ways.

Thursday, September 13, 2012

A Horse with No Name - further along the trail...


Not finished yet, not even close, but at least the white background is no longer staring me down.  There's still a long way to go and there's still no horse.  Maybe there will never be a horse. Unless you count the seahorse.

Saturday, April 21, 2012

Horse With No Name - Preliminary


I've been pretty much thinking about that horse wandering in the desert since America came out with the song  A Horse With No Name back in 1972.  Was it about a journey in the desert, or was it a spiritual metaphor, or was it an armchair foray induced by a drug trip? Since “horse” is a nickname for heroin it inspired all kinds of paranoia and was even banned on some radio stations. This, of course, simply increased its popularity. The song still gets air play 40 years later. 

No one really knows the true story behind the song so it remains on the musical mystery list, along with other titillations, such as just exactly who was it that was so vain in Carly Simon’s song?  After decades of speculation I’m pretty sure that even she’s not quite clear on it.  The same goes for Horse.  Whatever the inspiration - be it innocent or tawdry - it spawns great visuals.  You have a horse.  You have a desert. You have a guy who, after three days in the desert sun, is regretting having forgotten his sunblock (which wasn’t exactly popular in the 1970’s when we sun-fried ourselves into bacon strips while tanning on the beach).  You have at least the potential for a drug trip, and while heroin isn’t hallucinogenic, the visual elements mentioned in the song lead the imagination down the road to the psychedelic.  And, seriously, could a guy not on a drug trip come up with lyrics like, “the ocean is a desert with its life underground”?  I think not. 

So here is the very beginning of this quilt – just the background, mostly all hand dyed/painted.  The plants and birds and rocks and things have yet to be added.  The white area will hopefully be where the desert turns to ocean.   But I’m not that far along on the trip just yet…

Hopefully you haven’t noticed that there isn’t even a horse yet.  When he does arrive I might just give him a name.

Sunday, April 1, 2012

The Happy Nine Patch


Quilt No. 82
February 2012

In the fall of 2011 our quilt guild president announced this year’s challenge. We were to do a nine patch quilt. Apart from that, there were no limitations – it could big or small, conservative or wacky, or any variation of the nine patch we wanted – whatever suited our personal styles.

Challenge quilts are kept secret until we do our “reveal”. Our guild has a variety of quilters, who do every possible type of quilting imaginable. That’s the great thing about quilting – you could go on for a lifetime and never come to the end of the permutations of what can be done with a pile of fabric and a sewing machine, or a needle and thread. It’s like composing music – the possibilities will never be exhausted. I actually used to worry that this could happen when I was a kid – that musicians would finally come to the end of every conceivable combination of notes. I speculated that by the time I was ten years old, no new songs could ever be created again. I would have to listen to the Beatles singing about wanting to hold my hand in perpetuity - maybe not such a bad thing but there was the outside chance that it could get tiresome. Thankfully, creative pursuits are by their very nature unlimited.

Quilters are interesting creators because they can “think” in blocks. They can take shapes and break them down into clever components and come up with the pieces that will yield a perfect square representing anything from a flower to a compass to a cow. It’s something I have no talent for whatsoever. But I do like to take a concept, or an idea, and express it with fabric.

I decided my “nine patch” would be different. Traditionally a nine patch is a grid that is 3 blocks high and 3 blocks wide. The most common nine patch you’ll see is a tic-tac-toe game. Nine patch blocks can be re-arranged or re-cut to form an endless number of quilt variations. The previous summer I’d done a nine-patch quilt, and to save myself from embarrassment, let’s just say it was a less than happy experience. This time I wanted to have a happy nine patch experience - without the blocks. I just wanted the nines.

And so...the Happy Nine Patch was born – a group of cheery numeral nines cavorting on a lawn that is composed from a single silk neck tie. With a little creative piecing, I was able to make the borders from the same tie. The sky is a hand dyed piece, machine quilted to enhance the clouds. Additional machine quilting on the borders keeps the Happy Nines in their place.

Friday, March 30, 2012

Cloth Mountain


Quilt No. 84
March 2012

I was firmly embedded in my big leather chair reading a quilting magazine when I came across it -  a quilter describing how her fabric stash had become a “mountain of cloth”.  It hit me like a bolt of fabric: Cloth Mountain!  What better way to ransack my bloated fabric collection than by creating an actual “cloth mountain”?  I immediately began rummaging in boxes, dressers, bags, and my four sets of rolly plastic wheely drawers, admiring all the odd fabric bits I’d collected.  But how could I pull all of that loveliness together – and make it look like a mountain?  I’d need a whole lot of little pieces, but I didn’t I want to start randomly hacking tiny corners from a few hundred fabrics.  Perhaps this idea needed time to form on its own.

I resisted the adrenaline rush of first inspiration, and turned my attention back to other unfinished quilts.  I decided that when I had very small left over fabric pieces - below potentially usable “scrap” size - I would put them in a box and audition them later for Cloth Mountain.

After completing Julie’s Garden I noticed there were a lot of nice green pieces in the box.  A picture stared to emerge in my mind.  I would need white transitioning to grey, followed by darker grey, and then on through a range of greens.  And I already had most of the greens!  Now I was able to consult a much smaller number of boxes, bags, and fabric hiding places.  I cut a bunch of mini-scraps and into strips with the rotary cutter, and then sectioned these into irregular squarish pieces, dividing them up by colour and then each colour by value.  This technique is used in confetti quilting but with much smaller pieces.  It also requires a layer of tulle on top to hold everything in place. I wanted the mountain pieces to stay loose and shaggy, to resemble a cast off pile of random fabric bits so I had to do this without the tulle.

I found some stabilizer with grippy dots on it and drew a mountain on it. I began at the white peak of the mountain, and using monofilament thread and free motion quilting, loosely tacked one small section of pieces at a time onto the stabilizer, keeping the pieces loose looking.  It worked fairly well as long as I remembered not to fold the fabric during the quilting process.  If I did that the pieces would dump all over the place and have to be re-placed – again and again.  Eventually I got the mountain entirely covered.  It had almost as many pieces on it as the floor did.  The pieces migrated throughout the entire house and are still showing up in inexplicable places - like the drawer under the kitchen stove (which I swear contains pots and pans, not fabric).  I sewed the now “stablized” and assembled mountain onto the hand dyed background.

Now... what to put on the mountain?  My original rough drawing contains miniature skiers and snowmobilers, questing hikers, and a sewing machine perched at the summit.   All of this, when rendered in cloth, looked ridiculous – the scale was just too odd.  The design wall inside your head is far more forgiving that the one in front of your eyes!  I went back to thinking about what the concept was for this quilt.  It was a mountain of cloth.  And what had my personal mountain of cloth generated?  So far, 85 art quilts and related works!

I have digital photographs of all of these, but how to go from these to cloth, and how to keep the printed photos small enough?  Resizing 85 photos to less than half an inch across seemed likely to be a lifetime pursuit rather than a way to finish a quilt.  I noticed that the computer screen showing the quilt photos as icons looked like it might do the trick.  I did a screen capture of these icon pages and printed them out on iron-on printable  cotton.

When cut out into individual quilt photos the icons were the exact right size... if only I knew where to put them. Equally spaced around the border? The whole piece looked like a jumble. There was no place for your eyes to focus. On the mountain? They were completely lost to the eye.

The only empty area was the sky. But how would these 85 quilts get into the sky – what excuse would they use? A bird? A plane? Superman? A kite? That was it! I strung the icons spaced out along white strings behind the kite, but it still didn’t work. I sent a photo to my sister to get her input. She suggested that the quilt icons should not have spaces between, that they should touch one another. Brilliant – now they formed a continuous line that was pleasing to the eye. And so they came to be launched as the tails of a kite, stretching from the sky to the bottom of the quilt where a road sign announces “Cloth Mountain, Population 85” - celebrating of all my quilting projects so far.

Monday, December 19, 2011

Still Looking for Christmas

Quilt No. 78
September 2011

They re-make movies all the time – so why not quilts? Still Looking for Christmas got its start in the 1980’s - you can tell by the saturated reds and blues and the style of the art work in this one-piece panel. I knew almost zero about quilting at that time, but I did know I wanted to follow these little bears that were clearly enjoying their Christmas preparations.

This panel is intended to be an advent calendar. It came with a tiny bear that I sewed together and stuffed. The bear is to be moved to a different location in the house each day as he “looks” for Christmas. The whole idea really appealed to me as I remembered how, as a child, I too combed through the house prior to Christmas seeking evidence of Santa, and once eating an entire “found” container of Swedish tea ring cookies while my mother was at work. My father, left in charge, hadn’t babysat me often enough to know that I could hide in the lower kitchen cupboard where Mom hid the Christmas cookies.

I really didn’t know what to do with the Bear quilt panel, but I did know I wanted my daughter to have it on her wall. I had taken a beginner’s quilting course during my maternity leave, so at least I knew about adding batting and backing. Beyond that my knowledge got sketchy. I hand quilted around each room in the house, and that was about it. With a super busy three-year-old in the house, who had time for detailed quilting? Next, I went to square it up prior to binding it. Uh oh. It simply could not be done. The scene had been printed onto the fabric very crookedly. It was especially wonky where the lines of the calendar veered off on their own trajectory on the right hand side. As a novice quilter I was baffled as to what I might do. After much anguish, I finally bought some ruffled eyelet lace and sewed it all around the edge. It actually did a pretty good job of disguising the quilt’s lack of straightness. And so it remained for over 20 years, dutifully being displayed in my daughter’s room each year, even after she became an adult returning home for the holidays.

As my quilting skills improved over the years, I came to enjoy the bear quilt less and less. So crooked. So little quilting. So yellow with age. At some point in time, the stuffed bear had gone missing (or perhaps went off to college) and a small stuffed mouse of questionable origin had stepped in to take its place. I politely asked my daughter if we couldn’t retire this quilting embarrassment. My daughter hates to cause me grief or stress, but she was swift with her “No way!” She suggested that maybe I could update it? Brilliant! I immediately ran for my ripper and removed the offending eyelet lace. Then...I folded up the project and stuffed it under some UFO’s on my desk and left it there - for two years, maybe three. Christmases came and went without the bears celebrating it in their beautiful red and green house. Last summer the quilt somehow magically forced its way to the top of the UFO pile. Such is the magic of Christmas and how it continues to operate through-out the year. We usually just fail to notice it.

In the intervening years I had replaced my sewing machine with one I that could machine quilt with much more ease than the old cranky one. Machine quilting looks easy - until you actually try to do it. I’d done small bits of machine quilting here and there. Mostly I was unsatisfied with the results. I started reading articles on it, researching it on the internet, and watching YouTube video how-to’s. This proved to be very time consuming, as any session involving YouTube invariably devolves into endless viewings of cars skidding on ice, feats of dare devilism, concert viewings (The Doors on Ed Sullivan!), and a wallow through nostalgia in the form of Muppets segments or 1960’s cartoons. Skate boarding dogs and The Annoying Orange are also visually addictive. So, staying with the less than thrilling intricacies of machine quilting took more than a dollop of self discipline. Ultimately, I grasped that machine quilting is a skill. It’s like playing the piano, or hitting a tennis ball with the racquet instead of your head – it takes practice. You’ve got to do it over and over until the area of your brain dedicated to machine quilting finally “gets it" and burns it in like a cluster of songs on a CD. In order to improve your machine quilting technique, it’s said that you need to do 20 minutes a day for 30 days. So that’s how the bear quilt came to be renewed and my machine quilting skills finally came to improve.

I removed the old back and tossed it out with the old batting. I washed it, re-sandwiched it with new batting and backing, and set as my goal to do one room a day - or every few days - since real life still had to be part of the equation. A single room took about 45-60 minutes, so I tried to complete one room per session, moving on to the outer areas of the house and yard after the rooms were finished. It was kind of like a construction project where you do your interior decorating before you worry about the landscaping outdoors.

I finally finished the whole thing and even found the missing bear swimming around in a drawer full of notions. I added tiny sleigh bells, and Christmas buttons so that I could fasten on both the mouse and the bear as they patiently waited their turn to look for Christmas. I liked having two Christmas seekers to share the fun. After all, no one wants to be alone at Christmas.

But then, even though I had the experience of 77 finished quilts under my belt, the wonky-printing-on-the-fabric issue brought me to my knees yet again. If I put the binding on all four sides of the quilt, it would only emphasize its crookedness. I’d already decided that cutting the quilt wasn’t an option, I wanted to retain the original panel as a unit. I brooded over what to do – had I learned nothing in the intervening 20 years? In the end I put a series of double-sided holly leaves with tiny pompom berries around the bottom so that there was no straight line to look at. And, it sort of worked, but mostly just in my head. I guess I just like the contorted format after all. Who knows, maybe it wasn’t just a bad day on the fabric printing press back in 1987. Maybe the whole intention was for the bears to live in a world that was wasn’t too rigid. Perhaps that’s the whole point - to just enjoy Christmas and whatever unexpected directions it may bring.

Sunday, December 11, 2011

Julie's Garden


Quilt No. 81
December 2011

I spy with my little eye...Julie’s Garden! Who hasn’t spent a pleasant evening or car trip using their little eye to spy objects beginning with a selected letter of the alphabet? In the car Dad would say “I spy with my little eye...something that starts with “H”! I would yell from the back seat “HEAD! It’s the back of your head!” He would of course say yes, both of us ignoring the logic that he couldn’t exactly see the back of his own head - even if he wasn’t driving the car! So when I saw a pattern for an “I Spy” quilt I was hooked. I was like a fish that had swallowed not only the hook line and sinker, but the whole boat. I was obsessed, dragged unwillingly into the bosom of the crack-cocaine of quilting – the “I Spy” quilt. Sometimes it happens that way – a quilt that wasn’t even a thread on your horizon yesterday highjacks your psyche, making you decline food, water, air, chocolate. There is no mercy.

As an art quilter I have a massive collection of fabric bits and pieces. And all these fabrics have only one thing in common. They're all weird. For example, I have a tiny drawer filled with fabrics that are all either rocks or stones or bricks. I call this my masonry drawer. My untamed assortment of fabrics goes on and on like that – a drawer of Africa, a box of reds, a bag of music prints, two boxes of postcard quilt fabric (one labelled “Christmas” and one labelled“Not Christmas”). So when I came across a quilt pattern where I could use these wildly differing fabrics I knew I was at the cusp of quilting Nirvana.

By cutting a 3.5” square hole into a piece of cardboard, I was able to “spy” a perfect picture for each of the 120 blocks of the central portion of the quilt. It was almost too much fun, as though my rotary cutter and I had been unleashed in an endless garden of free fabric. I threw open all my drawers, bags, and boxes of fabric and began furiously cutting out squares. Flowers, fish, dogs, moose, snowmen, giraffes, books, bears, boats. Waldo. Yes, even Waldo – the “I Spy” theme reminded me of all the hours I had spent finding Waldo in those clever books with my daughter. My little eye definitely needed to spy something that started with “W”.

The inner border and outer binding strips also gave me a chance to use some of the fabric from my collection of “transition” fabrics. I buy these every time I see them – the gradual colour change across the fabric as it transitions from one colour to another makes these invaluable. I can nearly always find the exact shade I need in one place or another on a transition fabric. This explains why mine are full of holes – I usually need only a little piece, and so I extract a chunk here, and a snippet there. The quilting moth strikes again. For this quilt I was able to use a transition fabric in continuous strips, showing off its lovely subtle colour changes.

The outer border forms the boundaries of the garden. These gorgeous green prints from Brazil, a gift from Cris and Becky, are what bring the whole quilt together in a wonderful blending of fabric and family. I thank them both for indulging my passion for fabric with these treasures from the other side of the equator!